Here you’ll find some diagrams and instructions for basic flight controls and maneuvers to illustrate the key – learn the simple things first, basic movements and skills will naturally connect together as you progress.
Also available:
Basic Techniques Manual in Spanish
Manual de Técnicas Básicas en Español
(translation by Gustavo Di Si – PDF format)
For more advanced instruction, we suggest you visit LearnKites.com or the Rev Forum.
[accordion align=””]
[pane title=”1. Forward and Reverse Flight”]
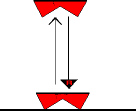 Rotate handles, thumbs back and launch the kite to full up altitude. Now, gradually rotate handles- thumbs forward- causing the kite to back down. Repeat this exercise while adjusting speed in both directions. Practice maintaining a straight line.[/pane]
[pane title=”2. Horizontal flight”]
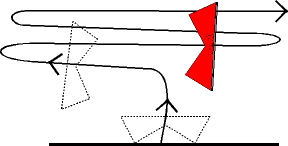 Fly up and to the right by momentarily applying pressure to the right thumb and then returning thumb back. As the kite approaches the edge of the wind, turn left and fly across horizontally. Attempt to maintain smooth, straight, flight.[/pane]
[pane title=”3. Horizontal reverse flight”]
 Begin as in exercise #1. When in full up position, tilt the kite slightly (10 degrees) by turning. Then apply reverse controls to both wings causing the kite to reverve down at a slight angle from vertical. To practice, visualize a diagonal line, then attempt to fly that line both forward and reverse. Gradually with practice, increase the angle approaching reverse flight.[/pane]
[pane title=”4. Basic Reverse Launch”]
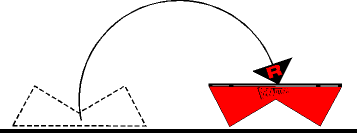 From the upside down position, apply full reverse to one wing (thumb rotates forward until top and bottom lines touch) and 10% to 20% reverse on the other wing. If the wind is low, pull handles down and back smoothly past you sides. This will cause your kite to roll over and land right side up.[/pane]
[pane title=”5. Fly and Slide”]
 Begin by flying back and forth as in exercise #2 with arms fully extended. As the kite flies across, pull back on the lower wing handle causing the kite to slide down as it flies across. Now re-extend the lower wing handle out and pull back on the upper wing handle as it slides, causing the kite to slide up as it continues flying across. To keep the kite flying forward as slides, be sure to keep the thumbs rotated back as you pull.
Any motion which includes a slide control is considered an advanced technique since it adds a third dimension to flight control. For example, control handle rotation will generate either forward or reverse lift depending on direction of thumb rotation, while the pulling motion generates a lateral or sideways lift component.
To improve touch while flying, practice responding to it with the proper control. For example, if the kite begins to slide down, pull back on the top wing handle to slide up. If the kite tilts clockwise, counter with the proper lift handle rotation, or right wing rotation, or combination of tright and left. Over control is the most common problem, sensitivity will come with practice.[/pane]
[pane title=”6. Full Spins”]
 Fly to a full up position then stop and hover. Generate a spin by sharply rotating one thumb forward while keeping hands together. When the spin is about 75% complete, return the thumb back to stop the spin. The stored inertia will continue to the upright position. Focus on timing while practicing spins in both directions. Continue with double and triple spins.[/pane]
[pane title=”7. Inverted Hover”]
 With the kite inverted on the ground, reverse launch the kite by rotating both control handles, thumbs forward. As the kite rises to about 4 feet, stop and hover by partially releasing the thumb rotation. This is a difficult exercise to master since “up” is now “down” and “left” is now “right”. Since most instability is caused by over controlling, try to launch and hover with as little hand rotation and pulling as possible. Initial hover periods of 2 to 3 seconds are good.[/pane]
[pane title=”8. Advanced Reverse Launch”]
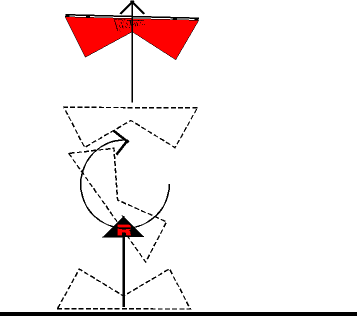 Reverse launch using both handles (see exer.7). As the kite reverses up about 6 feet, quickly rotate one of the handles, thumb back causing the kite to spin. As the kite rotates through 90 degrees (facing out to the side), quickly rotate the other handle, thumb back. Your control handles are now in the forward flight position as the kite’s inertia finishes the turn upward and into forward flight. The difficult part of this move is the timing of the control handle rotation to generate the spin and the forward flight sections. For example, the time between the spin and the forward flight signal is typically less than one second.[/pane]
[pane title=”9. Tip Landing”]
 Fly to a full up position then turn to the side and slide (see exercise 5) ending in a tip landing. Focus on a straight slide with no rotation. First initiate the slide, then with the pull position locked in, focus on stabilizing with slight wrist rotations. Practice regulating slide speed including stopping and sliding back up. As in all exercises, practice both left and right sides.[/pane]
[pane title=”10. Horizontal Reverse”]
 Fly up to 20′, turn 90° and fly toward edge of wind window. Apply thumb pressure (reverse control) to both handles to start reverse flight. As the kite begins to reverse, it will also start sliding down. While reversing, you can, at the same time, pull back on the high wing to counter the down slide. Fly slowly in reverse to avoid flipping a wing. Practice on level flight paths both forward and reverse.[/pane]
[pane title=”11. Facet Turns aka The Clock”]
 Fly up to hover at center of wind. Snap turn to 90° (c.w.), stop and hover… Snap turn to 180° (inverted), stop and hover… Snap turn to 270° (c.w.), stop and hover… Finally complete the rotation with a 90° snap turn to the face up position.
Practice both clockwise and counter-clockwise rotations. Focus on pure center point rotation and dead steady hovering between turns. For team flying, 8-point facet turns (45° intervals) should also be mastered. Precision and sharpness can be enhanced by following the snap turn by a momentary snap in the opposite direction thus canceling and instantly stopping the initial snap spin. This type of precision takes practice, but it also leads to world class level performances.[/pane]
[pane title=”12. Inverted Snap Spin”]
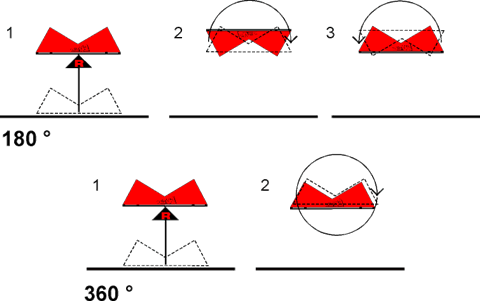 Reverse launch and hover at 5′ to 8′. Snap spin 180°, stop, and hover (facing up). Now reverse snap spin back to the original inverted hover.
Next, practice 360° snap spins from inverted hover to inverted hover.
Finally, practice both left and right sides.[/pane]
[pane title=”13. Slide Turns”]
 Launch and fly kite upward. Gradually pull one handle back causing a slight amount of sliding to the flight path. As the kite curves off, apply some thumb pressure to the pull side which adds a turn on top of the slide. The harder you pull the harder you slide, while the harder you rotate the handle,-the harder you turn. This move has the effect of moving the center of rotation away from the center of the kite, which is its natural point of rotation. For example, a large radius, gradual turn is produced by a large pull with a slight handle rotation, while a tight spin is produced using extreme handle rotation and little or no pulling.[/pane]
[pane title=”14. Instant Stop”]
 Fly full speed up then instantly throw both controls into full reverse for a moment (thumbs rotated forward), to instantly stop the kite. Quickly release the control handle pressure enough to stabilize the kite in a hovering mode. Practice in all directions. Focus on complete motionlessness during stop and hover phase. This manuver produces one of the most impressive REVOLUTION effects, the famous “Dive …. Stop” . Fly full speed down toward the ground and at the last second, when there is obviously no way out, slam on full brakes, stopping inches from the ground in an inverted hover.[/pane]
[pane title=”15. Reverse Flight Up”]
 Start inverted on the ground. Reverse both controls causing the kite to launch and fly upward in reverse. The most common problem encountered is a tilting, swaying, or rocking motion caused by over controlling and/or pulling. Also stopping and re-starting tend to cause instability problems. First start from the ground, directly down wind. As the kite becomes unstable during the reverse flight simply abort, and start again from the ground. Secondly, practice the inverted hover (exer. #7) to improve sensitivity. Reverse up slowly and smoothly to avoid wing flips.[/pane]
[pane title=”16. Inverted Side Slide”]
 Reverse launch and hover. Pull one handle back causing the kite to slide in the opposite direction. Initially, start slowly focusing on altitude, stability, and straight flight. Practice inverted hover (exer.#7) to improve sensitivity. Note: This is one of the most technically difficult skills to develop since it contains all three control methods while flying inverted![/pane]
[pane title=”17. Slow Motion Spins”]
 Center point, slow motion spins can be produced by changing the speed and timing of facet turns. First, facet turn through 360 degrees at 90 degree intervals with a one or two second hover at each facet point (90,190,270,and 360 degrees). Now, with practice, you can shorten the pause at each of the four points, and slow down the turn rate between points thus producing a slow, smooth, continuous spin. The key is to visualize the four hover points even though you don’t hover any more. This will allow you to stabilize the spin. (credit: Alan Nagao, High Performance Kites, Hawaii)[/pane]
[pane title=”18. Spin and Climb”]
 The REVOLUTION can actually climb and increase altitude during a spin by increasing the lift on an individual wing at the appropriate time. For example, as the kite flies straight up, pull sharply back on the right wing causing it to climb above the left wing. Now,during a clockwise spin, as the left wing climbs through the 270 degree point , pull sharply on the left control handle causing this wing to accelerate and climb upward during this part of the spin. As it rotates through the 360 degree point, extend the left handle back out in front of you to the normal flying position. Now, each time the left wing rotates into climbing position, repeat the pull (270 degrees) and release (360 degrees) sequence. Since you pull once per rotation, this is known as the single pull, spin and climb method.
For the double pull, you need to realize that one wing is flying forward (thumb rotated back), while the other is flying in reverse (thumb rotated forward). For the double pull method (c.w. spin), as the forward wing climbs through the 270 degree point, accelerate by pulling that handle while maintaining thumb back. Re-extend arm as the left wing rotates through the 360 degree point.
Now, continuing the spin as the reverse wing rotates through the 270 degree point, pull sharply on that handle while maintaining forward thumb pressure. Again, re-extend the arm outward as the climbing wing rotates through the 360 degree point. With practice, your timing will become smooth and accurate, and the “pull and extend” sequence will resemble a circular pumping action. Practice hand motion while visualizing kite rotation. This method can also be used to maintain altitude during slow motion spins.[/pane]
[pane title=”19. The Float”]
This is a technique used extensively in low wind conditions, and, is in fact, the key to light wind and no wind flying. It’s also used to regain lost ground from running back. The concept is to pull back on one handle so far that the wing is flying layed out flat and almost parallel to the ground similar to a plane or bird in normal flight. Start by flying across to the side as in exercise #2. Now, pull back-on the top wing, and push out on the bottom wing. Remember, as in all slide manuvers you must maintain forward, directed flight with proper wrist rotation. A common mistake is to apply a reverse control as you pull the control handle back. So to keep the kite king forward, keep both thumbs rotated back as you lay the kite out and float it. The body position is similar to shooting a bow and arrow. For example, left hand back to left ear, right foot forward, right hand fully extended out, and body facing in opposite direction to forward flight. For light wind conditions, keep the kite moving forward at all times since the wing speed is necessary to generate lift.[/pane]
[/accordion]

Recent Comments